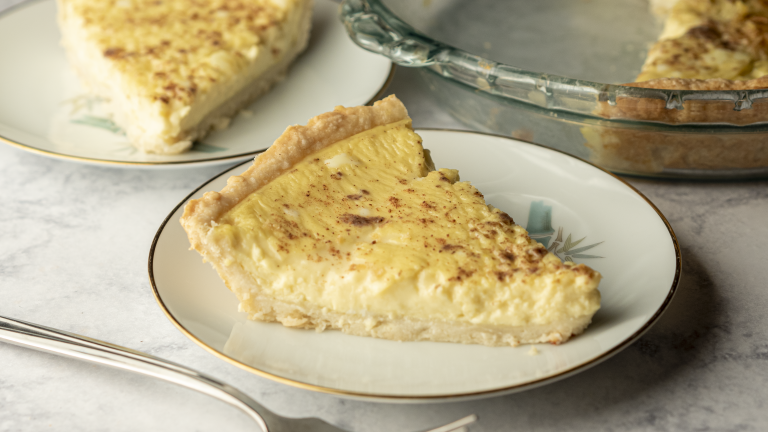
Hawaiian Style Custard Pie
Taking a bite from a piece of custard pie brings me back to the days of eating at the local bakeries. The texture of the custard pie is silky and melts in your mouth. To me the sweetness is just perfect! It’s not too sweet, enough for me to grab seconds…and maybe a third! It’s a light dessert that is perfect after finishing a heavy meal.

Custard pies are sold in almost any local bakery you find on the island. Many have fallen in love with this dessert for its lightly sweet taste and silky texture. It brings back those memories of taking that boxed pie and gobbling it down at home with family.
What is Custard Pie?
Custard pie is a made from milk, sugar, and eggs. Oh and a light touch of vanilla extract and salt. Dusted on the top of the pie is nutmeg to give that unique holiday-like taste. Traditional custard pie is usually made of milk and sugar, but this recipe replaces those ingredients with sweetened condensed milk. It still comes out like a normal custard pie, but in my opinion, better!
Order a Pack of 10 Recipe Cards
10 printed recipe cards featuring Hawaii’s local recipes. Handmade with Aloha! More details here >>> Recipe Cards

How to Make Custard Pie
A quick overview on how to make custard pie can be explained in three steps. First is laying the pie crust in the pie pan. Second, combining ingredients and adding it to the pie pan. Lastly, baking the pie to perfection. Pretty simple right?! But for this recipe I took an extra step to show how to make a homemade crust. Nothing beats homemade crust compared to a store bought crust. I won’t judge if you bought a store crust. We all have a limited amount of time.
Why Put in the Time to Make a Pie Crust from Scratch?
Weren’t you ever curious on how to make a pie crust? I was! And when I first made the pie crust, I was thrilled! Who knew it would be fun and interesting to see how a crust was made. The process of adding a bunch of lard and butter to flour and cutting it up into crumbly pieces was mind blowing. That’s what makes it into a crust? Who knows what other ingredients are added into a store bought pie crust.
Anyways, this recipe for the pie crust yields two crusts. If you are making just one pie, no problem! Just freeze the extra crust. Create the disc, wrap it tightly in plastic wrap and pop it in the freezer. It is good frozen up to 3 months. When you want to use the crust, let it thaw out in the fridge. Then boom you are able to use that crust. Just follow the rest of the instruction from the rolling pin part.

Baking the Custard Pie
Baking the custard pie is like science. You need to experiment how much time your pie should spend in the oven. What are the clues to when the pie is ready to take out of the oven? What advice I can offer you is that the pie is done when you stab a knife in the middle of the pie and it comes out clean, it is done! Another clue to it being done is when you shake the pie, it jiggles in the middle but is firm around the edges of the pie.
But what if you overcook it? That is a problem that can occur when creating a custard pie. You’ll know it is overcooked when the pie starts to look like scrambled eggs. Another clue to the pie being overcooked is a phenomena happens where the pie starts to “weep.” What I mean when the pie is “weeping,” is when you cut a slice from the pie, water starts to seep from the pie. Weeping happens when the pie is overcooked slightly and the molecules that are supposed to hold the liquid of the pie together, break!
So, the timing of the baking needs to be based off of your oven. Become a scientist and test it out in your kitchen. Have a little fun and soon you’ll become the Custard Pie Queen/King. Everyone will flock to your house whenever you make a custard pie. Good luck!
Video Tutorial
Check out this video to help you gain more insight on how to make Custard Pie. Also, subscribe to my YouTube to help support me so I can continue making more of these contents. Mahalo!
Silky Creamy Custard Pie
Equipment
- Oven
Ingredients
Pie Crust:
- 2 1/2 cup flour
- 1 1/4 tsp salt
- 3/4 cup vegetable shortening
- 6 tbsp unsalted butter (chilled and sliced)
- 1/2 cup iced water
Custard:
- 2/3 cup sweetened condensed milk
- 2 cup hot water
- 1/2 tsp salt
- 1/2 tsp vanilla extract
- 3 eggs
- nutmeg
Instructions
Making the Crust:
- Whisk together the flour and salt in a large bowl. Then add in the vegetable shortening and butter.
- With a pastry cutter, cut the mixture until it starts to resemble coarse meal.
- Measure 1/2 cup of water then add in ice water. Let it chill the water for a few minutes then measure out 1/2 cup of that chilled water. Drizzle in 1 tablespoon at a time to the flour mixture and mix it with a spatula. Repeat the same process until all of the water is used or until there are large clumps.
- Lightly flour a working surface. The dough shouldn't be too sticky but enough to come together easily. Fold or knead the dough until the flour has been combined well enough with the dough. Form it into a ball then cut it in half. Flatten each dough into a one inch disk.
- Wrap each dough in a plastic wrap. Chill the dough for at least 2 hours. If you are using one dough, freeze* the other dough to be used for the future.
- Unwrap the dough and using a rolling pin, gently form the dough into a large enough circle to fit a 9 inch pie pan.
- Line a pie pan with the pie crust and it is optional to create designs around the edges, but it is completely fine to keep it flat.
Preparing the Custard:
- Preheat the oven to 400°F.
- In a large bowl mix together the condensed milk, hot water, salt, and vanilla extract.
- Then in a separate bowl, beat together the eggs. Add the eggs into the milk mixture and whisk everything together.
- Pour the filling into the pie crust then sprinkle on the nutmeg.
Bake the Custard:
- Carefully add the pie into the oven and bake it for 30-35 minutes. To check if the pie is ready, stick a knife in the middle and if it comes out clean, it is ready!
- Remove the pie and let it cool completely then move it to the fridge to chill until it is ready to be served. Enjoy!