Lilikoi Butter
This lilikoi butter recipe is the real Local Hawaii version — silky, tart, and deeply golden. Made with fresh or frozen lilikoi juice in under 30 minutes.
This post may contain affiliate links. Our privacy policy.

Growing up on Maui, lilikoi butter was just there. Someone’s aunty always had a jar of it. You’d see it at the Saturday farmers market, little handwritten labels on glass jars, golden and glowing like bottled sunshine. We’d spread it on crackers, dollop it on pancakes, swirl it into yogurt without thinking twice about it. It was Local Hawaii food — not fancy, not fussy. Just one of those things that made home taste like home.
When I moved to the mainland and couldn’t find it anywhere, I learned to make it myself. Now I always have a jar in the fridge. You should too.
What is Lilikoi Butter?
Lilikoi is the Hawaiian name for yellow passion fruit — and it’s not the same as the purple passion fruit you might find at mainland grocery stores. The yellow variety (Passiflora edulis f. flavicarpa) is more intensely tart, more aromatic, and more deeply golden. Once you’ve tasted lilikoi, the purple kind feels almost mild by comparison.
Lilikoi came to Hawaii in the 1880s, introduced through cultivation, and it spread quickly across the islands in home gardens and wild roadsides alike. In Local Hawaii food culture, it became a go-to flavor for everything: jams, glazes, dressings, salad dressings, shave ice syrups, and this — lilikoi butter, a curd-style spread that’s somewhere between lemon curd and the most tropical thing you’ve ever tasted.
You’ll find it at farmers’ markets all over Hawaii, most commonly on Maui and the Big Island, where lilikoi grows prolifically. On the mainland? You make it yourself, which is honestly not a bad thing, because homemade is better anyway.
While away from the islands and in love with lilikoi, I found myself growing my own vine here in Utah! So far my little vine is growing beautifully. I named her Lily! I can’t wait til she starts growing fruits so I can make this lilikoi butter and lilikoi jam.
Why You’ll Love This Lilikoi Butter
- Pure Local Hawaii flavor — tart, floral, intensely tropical in a way that’s completely unlike anything you can buy at a regular grocery store
- Only 5 ingredients and ready in under 30 minutes on the stovetop
- Works fresh or frozen — made with fresh lilikoi or frozen lilikoi pulp, so it’s totally doable on the mainland year-round
- Endlessly versatile — butter mochi topping, pancake drizzle, cookie filling, cheesecake swirl, toast spread, the list goes on
- Makes a beautiful gift — pour it into small jars and suddenly you have the most Local Hawaii hostess gift imaginable. Way better than a candle.
- Strain it twice, and it’s silky-smooth — a fine mesh strainer is the secret weapon for that glossy, luscious texture

Ingredients You’ll Need for this Lilikoi Butter
Lilikoi juice (½ cup, strained) — Fresh lilikoi is the dream. Halve the fruit, scoop the pulp, and press it through a fine mesh strainer. You’ll need about 8–10 ripe yellow passion fruit to get ½ cup of juice. If you’re on the mainland and can’t find fresh lilikoi, frozen lilikoi pulp is your best friend. Thaw it and strain. It works beautifully and tastes incredibly close to fresh.
Eggs (3 large + 1 yolk) — The whole eggs set the curd. The extra yolk is what makes it rich, glossy, and deeply golden rather than pale. Don’t skip it.
Sugar (¾ cup) — Granulated white sugar works perfectly. The lilikoi is tart enough that you want this amount — don’t reduce it too much or the sourness becomes sharp rather than bright.
Unsalted butter (6 tablespoons, cold, cut into cubes) — Unsalted so you control the salt level. Cold butter is important — you’ll add it cube by cube off the heat, and the cold temperature helps it emulsify into the curd smoothly rather than pooling.
Salt (pinch) — Just a pinch. It rounds out the tartness and makes the lilikoi flavor pop.
How to Make Lilikoi Butter
-
1
Strain Your Lilikoi Juice
Halve fresh lilikoi and press the pulp through a fine mesh strainer until you have exactly ½ cup of pure juice. If using frozen pulp, thaw and strain the same way.
-
2
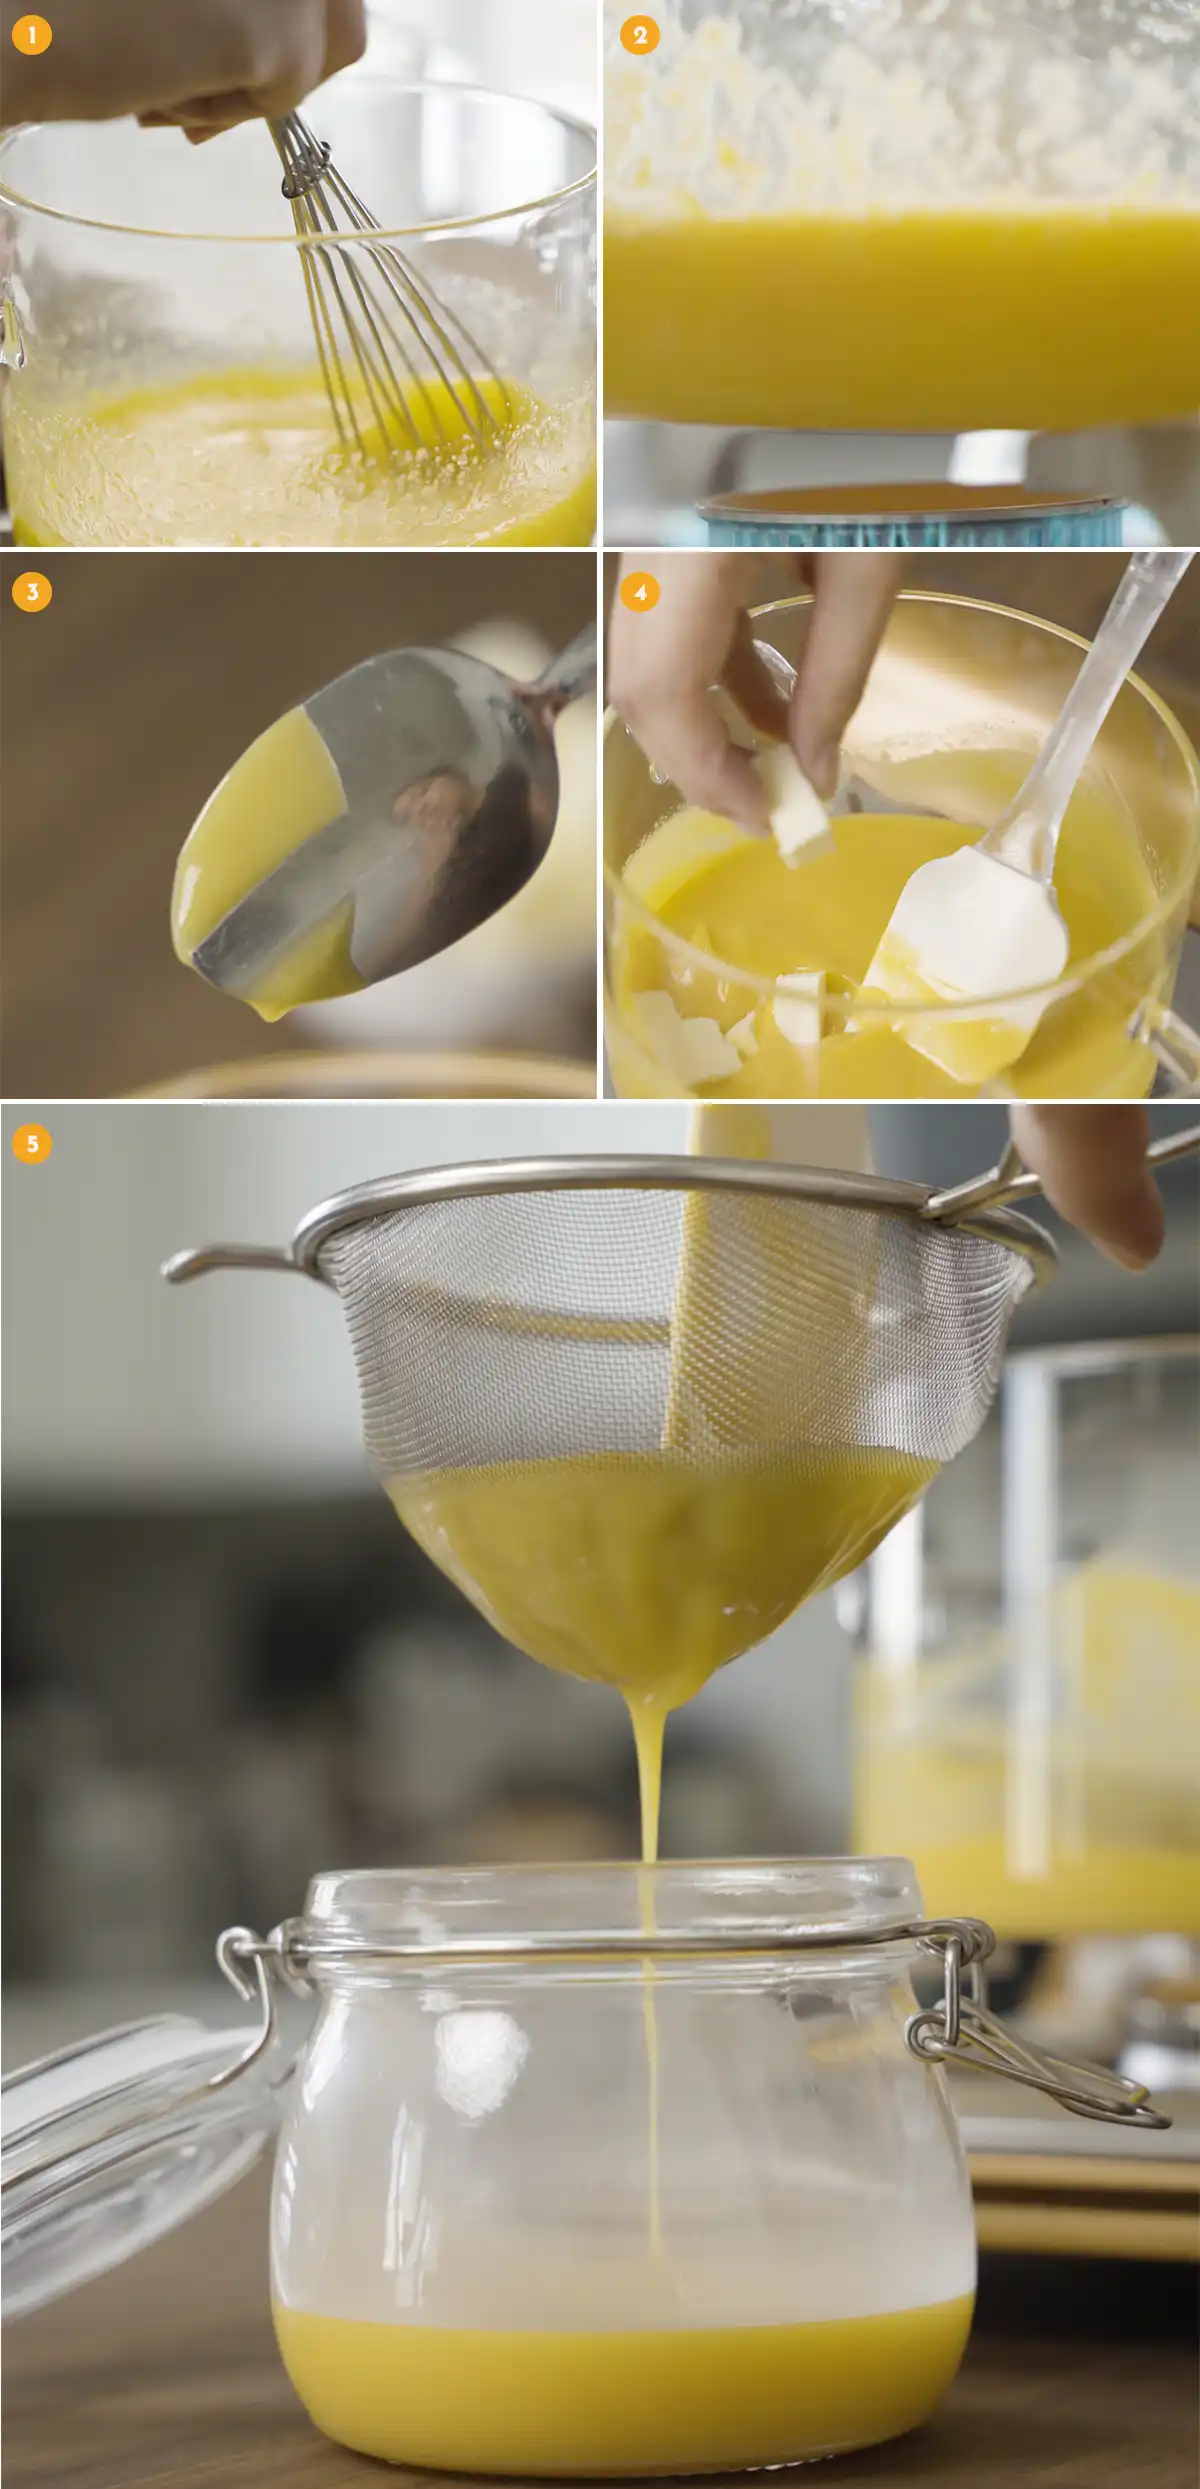
Whisk Eggs and Sugar Together First
Off the heat, whisk 3 eggs, 1 egg yolk, and ¾ cup sugar in a heavy-bottomed saucepan until pale yellow and mostly dissolved. This prevents the eggs from scrambling when the juice is added.
-
3
Add Lilikoi and Cook Low and Slow
Whisk in the strained juice, then set over medium-low heat. Stir constantly in a slow figure-8 motion, scraping the bottom and sides. Do not walk away or turn up the heat.
-
4
The Moment It Thickens — Pull It Off the Heat
After 10–15 minutes of patient stirring, the curd will visibly thicken. It’ll look glossy, coat the spoon heavily, and leave a clear path when you run your finger across the back of the spoon. The moment it reaches this point, pull the pan off the heat immediately. Don’t let it overcook or you’ll start to get a cooked-egg texture.
-
5
Add Butter Cube by Cube
With the pan off the heat, add cold butter one or two cubes at a time, stirring each addition until fully melted before adding the next. This takes 3–4 minutes and is what makes the curd silky.
-
6
Strain Again, Then Jar It
Pour the finished curd through your strainer one more time into a clean jar. Press it through gently with a spatula, let cool 10 minutes, then press plastic wrap directly against the surface before refrigerating.
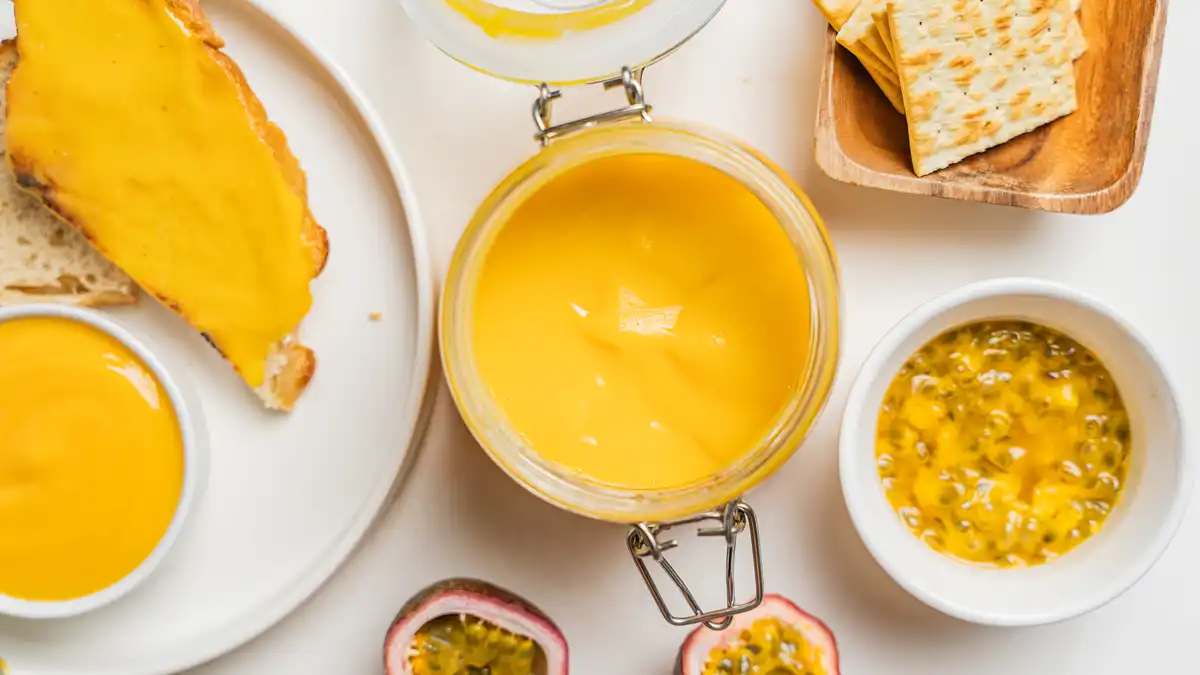
What goes with Lilikoi Butter?
Lilikoi butter is one of those condiments that makes everything taste more special — and in Local Hawaii, it really does show up everywhere.
The most obvious use is as a topping for butter mochi — drizzle it warm over a fresh-cut square and it soaks into the top just slightly, creating this sweet-tart-chewy combination that is genuinely one of the best things you will ever eat. I have the full butter mochi recipe right here if you need it. Lilikoi butter also makes an incredible filling for shortbread thumbprint cookies (coming soon recipe), which are a classic Local Hawaii holiday gift. Beyond that, try it swirled into yogurt or overnight oats, spread thick on a buttered English muffin, drizzled over vanilla ice cream, or stirred into whipped cream as a filling for a Hawaiian chiffon cake.
Store lilikoi butter in an airtight glass jar in the refrigerator for up to 2 weeks. It also freezes well — up to 3 months in a freezer-safe container. Thaw overnight in the fridge before using.
FAQs: Lilikoi Butter
You can, but the result will taste different. Yellow lilikoi (the variety grown in Hawaii) is significantly more tart and intensely flavored than purple passion fruit. The curd will still work, but the flavor will be milder and less bright. If that’s what you can find, go for it — just know it’s a different experience than traditional lilikoi butter.
Frozen lilikoi pulp is your best option and it works beautifully. Look for it at Asian markets or Latin grocery stores (Goya brand carries it), or order it online. Hawaiian Sun also makes a frozen lilikoi pulp that’s excellent. Thaw completely, strain, and measure exactly ½ cup just like you would with fresh.
Almost always, this means the heat was too high or the mixture was left unstirred. Eggs begin to scramble around 180°F. If it looks slightly grainy, try straining it immediately through a fine mesh sieve — you may be able to save it. If it looks scrambled-egg-level broken, unfortunately, you’ll need to start over. Low heat and constant stirring prevent this entirely.
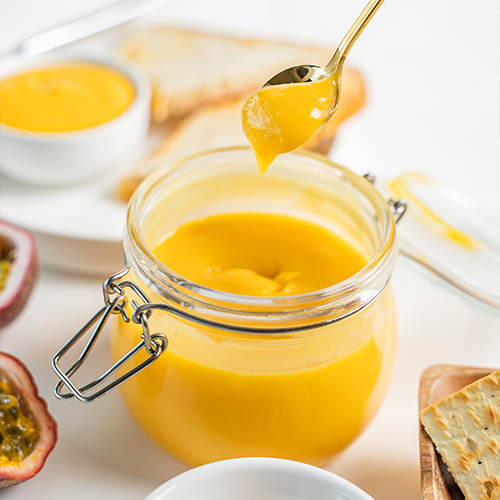
The curd should reach 170–175°F on an instant-read thermometer and coat the back of a spoon with a thick, glossy layer. Run your finger across the spoon — the line should hold cleanly without the curd running back together. That’s your sign, it’s ready.
Yes — substitute the butter with an equal amount of refined coconut oil (not virgin, which has a strong coconut flavor). Add it the same way: off the heat, one cube at a time. The texture will be slightly different, but it still sets beautifully, and the lilikoi flavor comes through clearly.
Every time I open a jar of lilikoi butter, I’m back at a Saturday farmers market in Maui, watching my mom debate which jar to bring home. It’s funny how much a flavor can hold — a whole place, a whole feeling, an entire chapter of home.
If you make this lilikoi butter recipe, I hope it does the same for you — whether it’s a true taste of home or your very first jar of something new. Spread it on everything. Share a jar with someone. And if you figure out a new way to use it that I haven’t thought of, drop it in the comments because I genuinely want to know.
Lilikoi Butter Recipe
Video
Equipment
- Medium heavy-bottomed saucepan
- Silicone spatula
Ingredients
Lilikoi Butter
- 0.5 cup lilikoi juice strained — from about 8–10 fresh yellow passion fruit or frozen lilikoi pulp, thawed
- 0.75 cup granulated sugar
- 3 large eggs
- 1 egg yolk the extra yolk makes it richer and more golden
- 6 tbsp unsalted butter cold, cut into small cubes
- 1 pinch salt
Instructions
- Strain your lilikoi. Press fresh lilikoi pulp or thawed frozen pulp through a fine mesh strainer into a bowl. Measure exactly ½ cup of strained juice.
- In a medium heavy-bottomed saucepan OFF the heat, whisk together the eggs, egg yolk, and sugar until pale yellow and mostly combined.
- Add the lilikoi juice and whisk to combine. Place over medium-low heat. Stir constantly with a silicone spatula, scraping the bottom and sides, for 10–15 minutes until the curd thickens and coats the back of a spoon (170–175°F).
- Remove from heat immediately once thickened. Add cold butter cubes one or two at a time, stirring each addition fully into the curd before adding the next. Take your time — this creates the glossy, smooth texture.
- Pour the finished curd through the fine mesh strainer one more time into a clean glass jar. Let cool 10 minutes. Press plastic wrap directly onto the surface, then refrigerate at least 2 hours to set fully.
Notes
- Storage: Keeps in an airtight jar in the refrigerator for up to 2 weeks. Freeze for up to 3 months — thaw overnight in the fridge before using.
- The curd will continue to thicken as it cools, so don’t worry if it looks slightly loose when you jar it.
- Dairy-free option: Substitute refined coconut oil for the butter in equal amounts. Add off the heat, one tablespoon at a time, the same way you would butter.


Easy to follow recipe with great instructions and photos!
Mahalo for giving it a try 🙂
This is one of the best recipes for Lilikoi butter that I have tried ! Former local here and it’s impossible to find on the mainland.
Awww mahalo Barbara! This is one of my favs to spread on my toast.